Kele Blog

Differential Air Pressure in Healthcare Facilities Is an Intricate Balance

When you walk into a healthcare facility, whether it be a hospital, outpatient facility, or even a nursing home, air quality isn’t the first thing to pop into your head; in fact, you probably don’t think about it at all. Yet, air plays an integral part in any facility. Without clean air, an entire healthcare facility could be exposed to any number of airborne bacteria. Hence the need for correct air pressure, to keep clean air circulating for the health of everyone who enters a facility.

Healthcare facilities are unique environments. Air pressure is an intricate balance of positive and negative pressures. Differential pressure is a perfect example. Not only do you have to monitor the air in a room, but also how it interacts with air outside of said room. It’s a never-ending cycle of how to best monitor the entire facility while keeping each section or room up to date with its own code requirements.

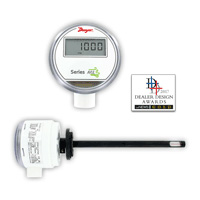
Take an isolation room, for example. Engineers’ (ASHRAE’s) Standard 170, Ventilation of Health Care Facilities, which is integrated into the Facility Guidelines Institute’s Guidelines for Design and Construction of Health Care Facilities, requires each isolation room to have a permanently installed visual device or mechanism to constantly monitor the air pressure differential of the room when occupied by a patient who requires isolation. The most reliable way to monitor room pressure is with the use of an electronic pressure monitor. When properly selected and installed, an electronic room-pressure monitor can provide continuous confirmation of the required pressure differential across the room boundary.

In addition to providing a continuous readout of pressure differential, the control panel should include both audible and visual alarms to warn staff when room pressurization is lost. The alarm should sound when the measured room pressurization is below the alarm setpoint. For example, in a room designed to maintain a pressure differential of minus 0.03-inch WC, the alarm could be programmed to activate when the pressure differential falls to minus 0.01-inch WC. The control panel also should have a programmable, built-in time delay to minimize nuisance alarms. The time delay should be set to allow staff sufficient time to routinely enter and leave the room, and typically is set between 30 and 45 seconds.

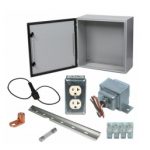
Correct differential air pressure is not an easy thing to achieve, yet when you utilize the correct systems and controls, the implementation of these very things can be a breeze.  What contractors and installers need to keep in mind are cost effectiveness and sustainability of systems when installing these systems. From sensors to switches, monitors and dampers, they all play an integral part. By doing this, they are able to combat high costs and create air systems that don’t overtax facilities. When you invest in these parts, you could potentially be saving lives while simultaneously providing clean, bacteria-free air. Implementing these parts should be a no-brainer.

This is where Kele comes in. We partner with the industry’s best suppliers to provide the best products; in this case, those products being any and all parts that help you maintain the correct pressure for any room in a healthcare facility. This diverse group of parts give the helping hand needed to combat ever changing air pressures. This small part plays a large role in ensuring perfect air pressure throughout a facility—down to every last nook and cranny.

Don’t hesitate to get in touch with the team here at Kele if you have questions. Contact us or visit us online for all your differential air pressure monitoring needs.

Back to Basics: Prepping Your Freeze Stats for the Freeze

UPDATED 11/19/2025


As temperatures start to dip, it’s easy for certain HVAC maintenance tasks to slip your mind—especially the ones that don’t demand attention until something goes wrong. One item you don’t want to overlook this season is your freeze stat. If you need a reliable replacement, we offer a range of freeze stat options that you can easily install or keep on hand. Before winter fully settles in, take a moment to confirm these controls are functioning properly. A few quick checks now can prevent costly headaches later.


What are Freeze Stats?

According to The Air Conditioning, Heating and Refrigeration News, “The freeze stat is a safety switch that is used in almost all commercial and industrial air-handling units, cabinet unit heaters, unit ventilators, and blower units that have chilled water and/or hot water coils.” In short, freeze stats and low-temperature cutout controls exist to protect your coils from freezing and rupturing.

Testing them isn’t as simple as pressing a button. Because freeze stats rely on copper sensing tubes filled with temperature-sensitive gas, any kinks, cracks, or damage from installation or handling can compromise their accuracy. That’s why a careful, hands-on test is essential to ensure these controls will respond properly when temperatures drop.

Here are some steps on how to test your controls:

Step 1. Make sure they are installed in the correct location—directly downstream of the hot water coil (upstream of your cooling coil) in a horizontal serpentine fashion, spaced evenly across the coil. This location will prevent false trips and provide full coil coverage.

Step 2. f the freeze stat comes with an adjustable temperature setting, set the temperature as low as you feel comfortable without dropping below freezing (35°F is typical).

Step 3. Buy freeze spray, such as our freeze stat test spray, or ice and physically apply to 12 ̋-18 ̋ of the serpentine copper tubing that holds the temperature-sensitive gas vapor. The gas vapor pressure will drop and cause the freeze stat to trip.

Step 4. Verify the sequence of operations that occurs or that is supposed to occur when the freeze stat trips. This will typically include a shutdown of unit fans, closing of the outdoor air damper, and an opening of the hot water valve.

Step 5. Once complete, you will need to reset the freeze stat if it does not do so automatically. In some cases, you may need to physically reset the freeze stat as well as clear any front-end alarms that have been programmed to prevent the unit from automatically restarting after a freeze condition.

Kele has freeze stats and can offer technical advice to make sure your system is ready. Give us a call at 877.826.9045 if you have specific questions about your job or need help finding a part. We are ready to help.

Kele Launches NEW Contractor Control Panel Kit

While Kele’s custom panel shop builds thousands of panels each year, there are times when a contractor needs to assemble a panel in the field. Kele understands this and recently launched the Contractor Control Panel Kit (CCP) to make this process easier for contractors in those situations.

The CCP is designed for quick field mounting of controls. Contractors can easily install preferred control components, terminate devices, and mount the finished panel to stay on schedule. The unassembled kit is shipped with all the components needed to complete an installation.


Core components included:

  • Pre-cut aluminum DIN rail
  • Grounding lug
  • Terminal block
  • Convenience outlet
  • Inline fuse holder
  • Secondary fuse protection (2 A and 250 V)
  • Transformer (40 VA, 120:24V) or (100VA, 120:24VAC)

The CCP also provides enclosure options from Kele’s NEMA-rated RET line. Customers can select a 16×16 or 24×24 RET4 or a 20×18 or 26×20 RET1. A perforated sub-panel is included for easy component mounting. Components can be set and quickly attached with a self-taping screw in pre-punched holes.

A significant benefit of the CCP is that it allows a one-time, easy order of the kit and field devices together. This will help keep installations on schedule and allow contractors to continue generating revenue.

Shop the Kele Contractor Control Panel Kit today or contact us for more information.

What Is ACH and Why Is It Important?

Contributed by Dwyer Instruments
Written by Andrew Goldschmidt

If you’ve ever spent time in a hospital, you may have noticed a device similar to a home thermostat mounted on the wall with a display stating “ACH”. What exactly does “ACH” stand for and why is it important in a building or hospital?

What is ACH?

Air changes per hour (abbreviated as ACPH or ACH) or air change rate is a measure of the air volume added to or removed from a space divided by the volume of the space. Simply put, air changes per hour are the number of times you change over the total volume of air in a defined room or space. Air changes per hour are calculated by first determining the volume of the space you will be exchanging air in. This is calculated by multiplying the length by width by height of the room.

To calculate the air changes per hour, multiply the incoming or supply air flow rate (Q) in units of cubic feet per minute (CFM) by 60 minutes per hour, and then divide that number by the volume of the room.  One “air change” results when all of the air in the room has been replaced.

ACH = (60 × Q) ÷ Vol

Q = Supply air flow in CFM

Vol = Space volume calculated by L × H × W in cubic feet

Why is ACH important?

Homes and workplaces are full of potential contaminants ranging from VOCs (Volatile Organic Compounds) to common dust. Proper ventilation and the exchange of air is the best way to reduce the presence of these pollutants, maintaining a healthy living and working condition.

Dating all the way back to 1973, ASHRAE has provided a set of standards for minimum ventilation requirements in commercial and residential applications that is found in ANSI / ASHRAE 62.1 and 62.2. These standards are incorporated into the design and size requirements of air handling equipment to ensure the space classification is seeing an adequate amount of air changes.

In commercial office spaces, it is common to see air changes per hour of 6 to 8. On the other hand, hospital operating rooms and patient rooms can have air changes per hour of up to 25. You may also notice thermostat-style devices are continuously indicating air change rates in these rooms, allowing nurses and doctors to quickly identify safe working and operating conditions for patients.

To monitor the air changes per hour, individuals can measure the supply air entering the room or space, as well as the exhaust air or return air. With both of these readings, it’s easy to determine how many air changes are occurring. This can be temporarily accomplished with test and balance instrumentation, such as by using air flow hoods to monitor the air flow coming out of diffusers, or by using anemometers or Pitot tubes to monitor the air flow in supply duct work or return air duct work.

For more permanent installations, products such as averaging Pitot tubes, air flow stations, or hot wire anemometer transmitters can be installed to provide a building management system with real time air velocity measurements. Dwyer offers several air flow monitoring instruments to simplify the calculation of air changes per hour. These products can ensure a comfortable environment for individuals occupying the space.

Shop Dwyer air flow products here.

Kele Launches My Project Portal to Speed Up Ordering Process

New e-tool allows customers to upload full material list and quickly locate parts.

Kele recently launched My Project Portal on kele.com. My Project Portal is Kele’s latest e-tool and is designed for times when customers need to quickly source a full material list. The tool allows users to upload a complete BOM, see a price, and checkout within minutes. Customers have three options for uploading lists, including an Excel file, copied and pasted information, or entered manually.

“The goal of My Project Portal is to make our customers’ lives easier,” said Kele Director of Marketing Katie Campbell. “Many customers find themselves sourcing products on their material list from multiple resources and vendors. This results in multiple POs and invoices, disorganized shipments, and products not arriving on a desired schedule. My Project Portal streamlines the entire ordering process.”

Once material lists are entered, they can be saved as either a template, list, or project prior to ordering. Users also have the ability to search/add additional parts and collaborate with team members and Kele sales associates. Other features include: 

  • Customization by adding additional parts through predictive search and adjusting quantities
  • Sharing capabilities across a customer’s account
  • Ability to email to others on a customer account or print for internal signoff
  • Options to add descriptions and tags
  • Filtering by various tags, favorites, date created, etc.

Customers can log in and access My Project Portal directly. Kele also developed an overview and tutorial video on how to access and use the tool. Get started now or contact Kele for assistance.

Kele Product Matching Solution Expands Again

Finding alternative products and accessories easier than ever before

The product matching solution on kele.com has expanded to 119,000 pages. Finding an alternative part, related product, or accessory is easier than ever. The expansion is the latest step for the initiative that launched last year.

Kele developed the solution initially as way to help customers find direct or functional alternatives to products affected by the tariff on Chinese imports. Phase one included 50 frequently purchased products before expanding to 1,000 products a few months later. Steady progress has taken the effort to its new level.

What customers see on kele.com:

Users also see a “Customers Also Bought” section as well as a “Top Sellers” section containing products in the category of the product being viewed. Along with Kele’s new e-tool, My Project Portal, the matching solution helps customers locate the parts even faster.

Shop now and see how easy it to find the products you need.

Installation of the TDP05K Advanced Thermal Dispersion Airflow and Temperature Measuring Probe

The video above guides you through installation of the Ruskin model TDP05k.

How to install a Ruskin model TDP05K

The Ruskin model TDP05K measures and displays air flow and temperature using up to 128 sensing points per air-measuring station. The TDP05K’s surface-mounted, moisture-resistant flex sensors are designed for long life, even in the worst environments.

The TDP05K eliminates:

  • The transmitter box
  • Fixed-length proprietary cables
  • Fragile bead in-glass sensors

The complete air-measurement station has at least one primary probe. For openings that require multiple probes, additional ancillary probes are supplied. The TDP05K is the correct solution for many air measurement applications.

Check out the TDP05K, and other great Ruskin products, here.

The Belimo Energy Valve 3.0

The Belimo Energy Valve 3.0

The Belimo Energy Valve is an Internet of Things (IoT) device utilizing advanced cloud-based analytics to leverage captured system data to the full potential, providing savings and the most efficient operation. The Energy Valve is a pressure independent valve, which measures and manages coil energy by using an embedded electronic flow meter, along with supply and return water temperature sensors. Ideal for waterside control of heating and cooling coils.

Cloud Optimization

Monitors and enhances energy usage delivering optimal system performance. System analytics are also provided to show historical performance.

Delta T Management

The Belimo Delta T Manager algorithm reduces pumping and chiller/boiler operating costs by increasing plant efficiency and maintaining design Delta T.

Energy Monitoring

An integrated energy meter provides accurate coil performance data. The data is used to verify system performance during commissioning and acts as a baseline. This feature helps achieve LEED points through Energy and Atmosphere within credits 1 and 5.

Shop the Belimo EV Series on kele.com.

Questions from the Field

Damper closed with a dead motor? Faulty actuator a different brand from the smoke damper? 

Sometimes we hear from customers who find a smoke damper closed with a dead motor after spending significant time investigating why a zone has no airflow. Another scenario is a customer responding to a service call to replace “faulty actuators” to find the actuator on a smoke damper of a different brand. Typically, the question is, “What should I do first?”

These are common occurrences, and you definitely don’t want to refer the customer to another contractor, not to mention waste a trip. Read below for some helpful tips on where to start. If you are still unsure, snap a few photos with your phone and send them to our technical service team.

Where to start?

  • Familiarize yourself, and your team, with the smoke damper codes and local codes. Take a look at UL555, UL555S and research the local practices. NFPA 80 and NFPA 105 are applicable to dampers and doors; get a copy and review them.
  • Know your specific job’s control system sequence and smoke damper specifics (dimensions, torque, make, UL label, etc); estimate the scope of the repair/replace project.
  • Discuss the technical situation and the specific application with the Authority Having Jurisdiction (AHJ), the local Fire Marshal, and the building inspectors. Assure them that the work will be done in accordance with local codes and “…in accordance with the damper manufacturer’s normal field servicing program.”
  • Get the model number and any available information on the actuator being replaced. You may be able to replace it with a like-for-like model or you may need to replace it with new. Actuator replacement really starts with the damper, not the actuator. The same old motor can be applied in several ways, depending on the spring, thermal disc, etc. You will come across some very old models that cannot be directly replaced with a like actuator because they are no longer made or do not meet the new UL standards.
  • If the actuator has an internal or external spring and there is a separate thermal sensor/high limit switch with reset, you should be able to replace the spring/actuator with a new model.
  • If there are dual springs—one for the fusible link and one for the actuator—you should be able to remove the actuator and its spring while leaving the fusible link and its spring in place.
  • Old dampers that use cables and pulleys generally must be replaced entirely; you can’t simply replace the actuator.

Check out the fire and smoke damper actuators Kele offers.


Considerations for Selecting a Duct Smoke Detector

HVAC air ducts transfer conditioned air to occupied spaces in a building. In the event of a fire, air ducts can also transfer harmful—and even deadly—smoke, toxic gases, and flames to those same occupied spaces. National and local safety codes and standards address this issue by specifying the use of duct smoke detectors to help prevent injury, panic, and property damage. To prevent the spread and recirculation of smoke and other products of combustion, duct smoke detectors are used to shut off air handling systems, fans, and blowers when necessary. Duct detectors are often connected to the building’s fire alarm system and may also be a part of a control system designed to exhaust smoke to the outside of the building. Duct smoke detectors are not to be used as a substitute for open area protection or early warning detection nor are they a substitute for a building’s regular fire detection system.

To detect smoke, detectors consisting of a sensor within an enclosure are mounted outside of the duct. Sampling tubes connected to the detector enclosure penetrate and traverse the duct to draw air into the detector, sample it, and then return it
to the air stream. When particles of smoke suspended in the air reach the alarm threshold of the detector, an alarm signal is initiated, and appropriate action can be taken to turn off equipment and alert the building’s fire alarm control panel.

Regardless of the sensing technology used, a duct smoke detector must be installed in a location that will ensure the detector monitors representative samples of
air flowing through the duct. There are several factors to be considered when selecting a detector location in a duct.

  • Dilution: Duct smoke detectors will alarm only when combustion particles make up a specified percentage of the sampled air. If circulated air mixes with fresh outside air, the combustion particle concentration can dilute and prevent a detector from sensing a fire condition. To avoid dilution, detectors should be located before fresh air intakes and before the exhaust air output.
  • Stratification: Within a duct, air and combustion particles may stratify, preventing proper air sampling. To get a representative air sample, locate the detector between six and 10 duct widths downstream from a bend or other obstruction in the duct. 
  • Excess humidity: High levels of humidity or condensation within the duct can cause false alarms. Duct smoke detectors should be located a minimum of 10 feet downstream of humidifiers. 
  • Air filters: Air filters within ducts tend to collect flammable materials
    like paper, lint, and trash. Detectors should be installed downstream of filters to detect fires occurring in the filters. Regular filter maintenance is critical since reduced air flow due to clogged filters could prevent correct operation of the duct detector. 
  • Air velocity: Duct smoke detectors are designed to be used in air handling systems having a certain range of air velocities, usually 500 to 4000 fpm. For applications down to 100 fpm, low-flow technology detectors are available.

Finally, when applying, installing, testing, and maintaining duct smoke detectors, be careful to follow the detector manufacturer’s instructions and adhere to National Fire Protection Association standards National Fire Alarm Code (NFPA 72) and Standard for the Installation of Air Conditioning and Ventilating Systems (NFPA 90A). Copies of the standards can be ordered from www.nfpa.org.

Kele offers a variety of duct smoke detectors and accessories.