One of the most popular and long-lived methods for transmitting analog control signals in the HVAC and industrial control worlds is the “constant-current signal loop.” In this scheme, the value of the current flowing in the circuit is the control variable, rather than any voltages that may appear at different points in the circuit. The constant-current loop is very robust and noise-tolerant and can run for long distances. Even in this high-tech digital age, it remains a very popular analog signaling method.
This article will deal with how to connect multiple loads to a constant-current signal loop. Connecting multiple loads to a constant-current signal loop is totally different than connecting multiple loads to a voltage signal source (which is covered in a previously-published article for those interested).
In the HVAC world, the most common range of current used for constant-current signaling is 4-20 mA (1 mA = 1 milliampere = 0.001 amperes of current). 4 mA represents 0% of the variable’s value and 20 mA represents 100% of the variable’s value. Other current ranges can be used, but today we’ll work exclusively with 4-20 mA current loops.
Current loop load “resistance” or “impedance”
Every load to be connected in the current loop will have an electrical characteristic called “resistance” or “impedance.” The load’s data sheet might use either term. Don’t worry about whether the data sheet says “resistance” or “impedance” we’ll take them to be the same thing. In this article we’ll use the term “impedance.”
Impedance is measured in units called “ohms.” If you don’t know what ohms are, don’t worry. All you have to do is use the numbers in some simple calculations later on.
Basic constant current loop configuration
Before we discuss connecting multiple loads to a constant current loop, let’s get familiar with the basic constant current loop containing a single load:
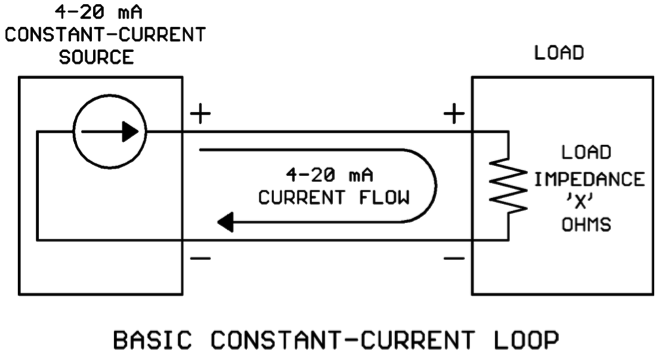
On the left we have a constant-current source that is regulating the current to some desired value (the desired value is determined by a calculation in a controller, measured physical value in a sensor, etc.). The constant current leaves the source, flows through the load, and returns to the source.
Simple, right? What could go wrong? As usual, “the devil is in the details.”
Two different styles of current sources
There are two different styles of current sources you should be aware of. We’ll call the first style the “locally powered” current source. It has its own source of power for the 4-20 mA output and the only other item needed to complete the loop is the load:
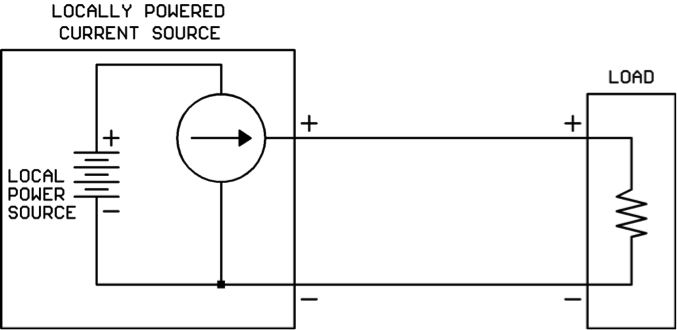
You will usually find this type of current source on the output of a powered controller.
We’ll call the second style the “loop powered” or “2-wire” current source. It does not have its own power source built-in, but rather depends on a separate power source (usually 24VDC) wired into the loop:
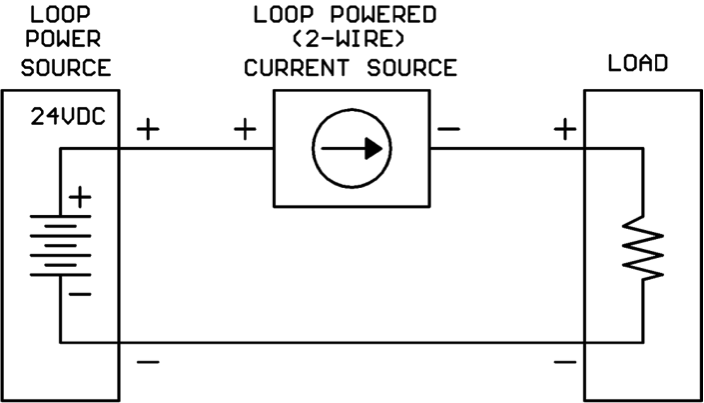
You will find this type of current source in many 4-20 mA loop-powered temperature, pressure, and humidity transmitters.
Current sources have a “maximum load impedance” they can drive
Current sources like small values of load impedance, in fact they can drive their current straight into a short circuit (zero ohms load impedance)!
Current sources run into trouble when the load impedance gets too large. When the load impedance gets too large, the current source will not be able to make the higher values of current (near the 20 mA end) flow. The current value will plateau at some value less than the desired value.
How do I know the “maximum load impedance” my current source will support?
For a locally-powered current source, you will need to find the maximum load impedance value on the product’s data sheet.
For a loop-powered current source, you may find a parameter called “maximum load impedance (with 24V supply)” on the data sheet. If you do not, you will have to perform the following steps:
1. Find a parameter called “minimum operating voltage” (or some very similar wording) on the current source data sheet.
2. Calculate maximum load impedance as follows:
Maximum load impedance = (Loop power supply – minimum operating voltage) / 0.020
For example, suppose we are using a 24V loop power supply and we see on the data sheet that the 2-wire current source needs a minimum of 11V to operate. Then we would calculate:
Maximum load impedance = (24V – 11V) / 0.020 = 650 ohms
Now that we know something about how a single-load constant-current loop works, let’s see what kind of complications we get into when trying to drive multiple loads!
Connecting multiple loads to the current loop
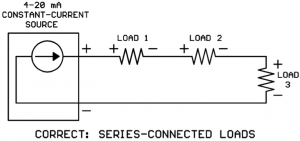
Rule #1: All loads must be connected in series around the loop, never in parallel.
Below are sketches of the right way (series) and the wrong way (parallel) to connect loads in a current loop:
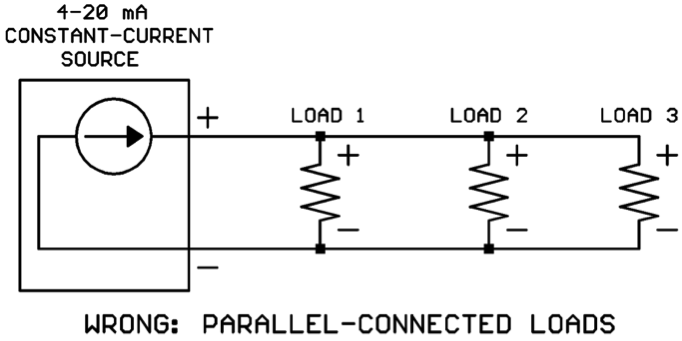
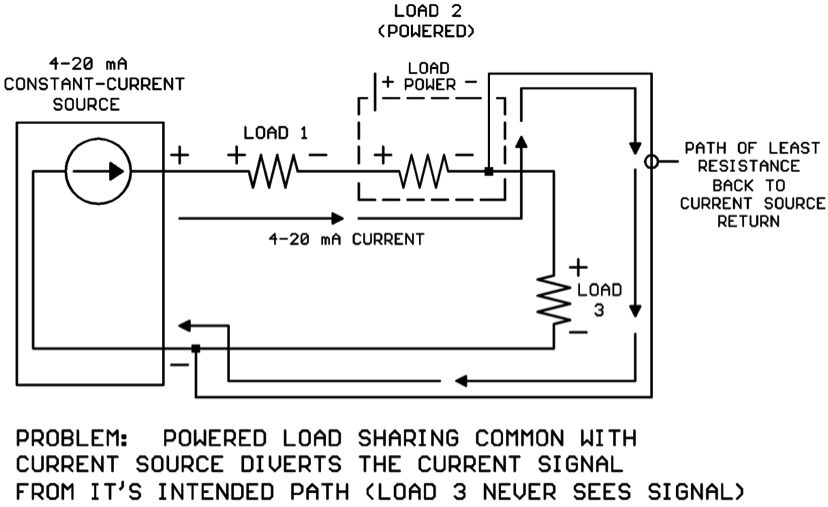
At first glance this requirement seems simple enough. That’s because we’ve drawn all the loads as 2-wire loads that don’t require power supplies. A not-so-obvious problem may occur if the loads do require power supplies. The current will always take the “path of least resistance” back to the current source whatever that path might be. If one of the loads before the last load has a power connection back to the current source, this connection will be the “path of least resistance” and the 4-20 mA will bypass the rest of the loads in the loop:
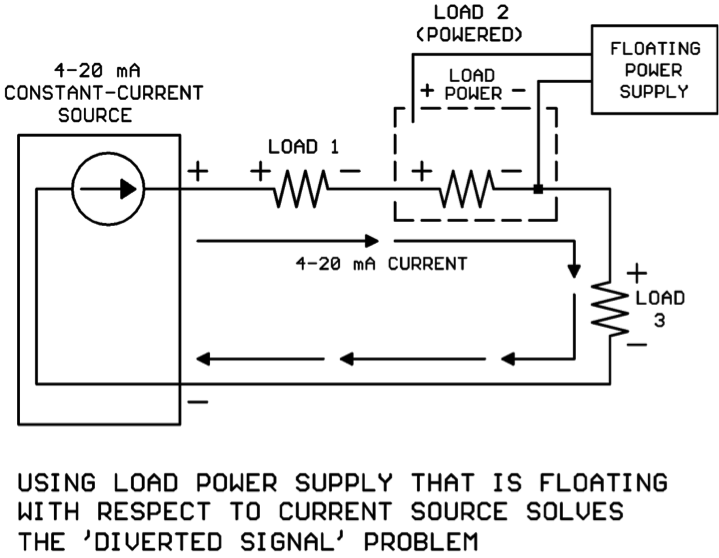
If the powered load is a standalone module, you may be able to use a dedicated “floating” transformer or small DC power supply to power the load and resolve the issue:
If multiple loads in the series connection are powered, each load would need its own power supply that is floating with respect to all the other supplies. For example, if Load 1 and Load 2 were both powered, Load 1 would need a power supply that is floating with respect to Load 2 and the current source, and Load 2 would need a power supply that is floating with respect to Load 1 and the current source. It can get messy quickly if there are several powered loads in the loop!
Consider also that If the powered load is a controller input and the controller is serving other inputs and outputs, it wouldn’t be practical to “float” the entire controller subsystem’s power connections.
In cases where a floating power supply for each load is not practical, it’s time to employ a signal isolator module such as the DT-13E from Kele:
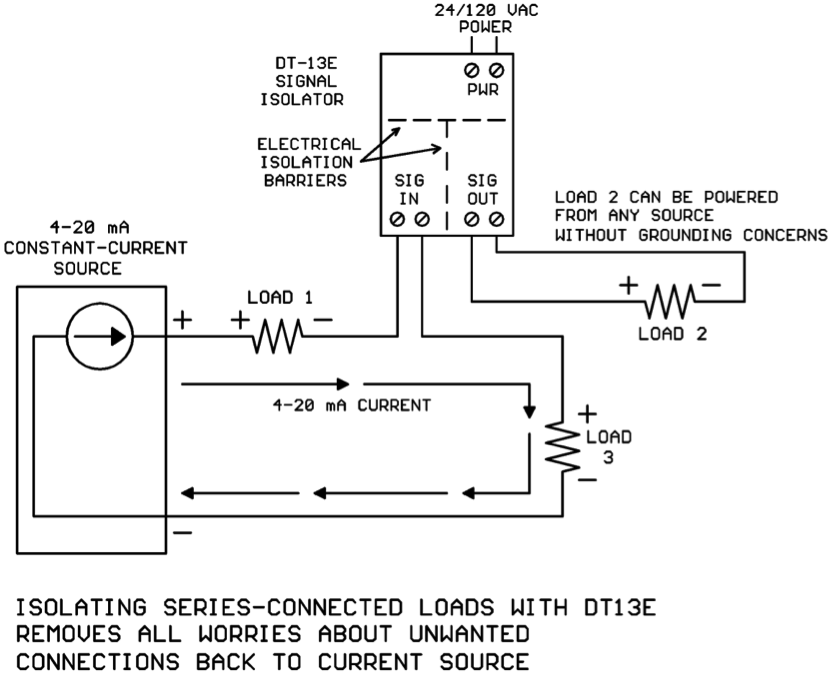
The DT-13E signal isolator has its inputs isolated from its outputs, and both inputs and outputs are isolated from the power terminals. So with the DT-13E installed, it just doesn’t matter where Load 2’s power source comes from, it will not corrupt the 4-20 mA current in the loop.
Rule #2: The sum of all the load impedances must be less than the maximum load Impedance the current source can support.
When the mA loads are wired in series (as they must be) the total load impedance seen by the current source is the sum of the individual load impedances. So if each of the three loads in the drawing below is 250 ohms, the total load impedance seen by the current source would be 250 + 250 + 250 = 750 ohms:
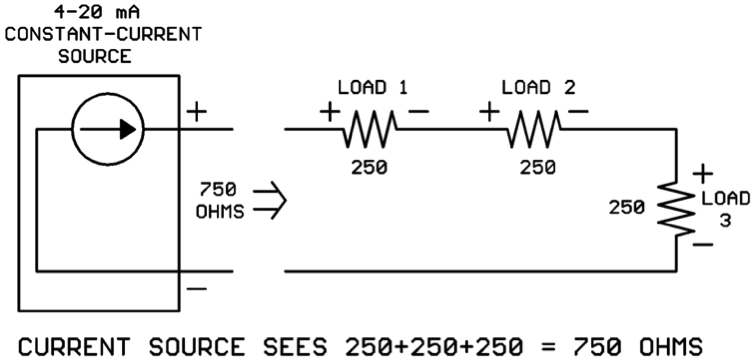
Suppose your current source data sheet shows that it can only drive 650 ohms maximum impedance? Houston, we have a problem…
What can you do if your total load impedance adds up to more ohms than the current source can handle? This is another way that the DT-13E signal isolator can sometimes help. Many HVAC 4-20 mA loads have impedances of 250 to 500 ohms, but the DT-13E mA input impedance is only 125 ohms. So by isolating one or more loads using DT-13Es, not only do you remove grounding concerns but you may also lower your total loop impedance to a value the current source can handle:
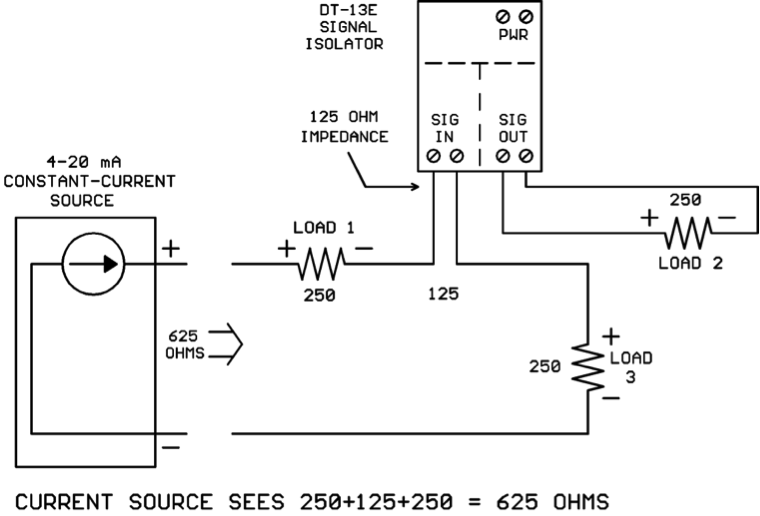
Now the current source only sees 250+125+250 = 625 ohms which is lower than its maximum load impedance, and Rule #2 is satisfied.
Conclusions
Multiple loads inserted in a 4-20 mA current loop must be connected in series. If the series-connected loads are powered devices, “sneak paths” between the load power supply connections and the current source may misdirect the 4-20 mA so that not all the loads receive the signal. Isolating the series-connected load with a DT-13E or similar signal isolator will solve this problem.
The sum of the series-connected load impedances may be too high for the current source to handle. The DT-13E signal isolator’s impedance of 125 ohms is less than that of many common HVAC loads. Isolating a load with the DT-13E may lower the total loop impedance to an acceptable value.


I am genuinely grateful to the holder of this site who
has shared this fantastic article at at this place.
If some one needs to be updated with latest technologies then he
must be go to see this web site and be up to
date everyday.